Setting up your printer
Tap the printer badge at the top left of any screen to open Printer settings. The cog at the top right opens the app's own Settings, including day colours and locale.
- Choose Standard or Advanced mode.
Standard sets up one printer. It is separate from the Advanced list: changing it never changes that list, and it does not need to appear there. Advanced is for several printers, with a default: save up to 3 printers on Free or 10 on Pro. The active mode determines where the app prints. Leave it on Standard for one printer.
- Choose your printer model.
Pick it from the list, or tap Scan and point the camera at its packaging to read the model name and roll code. In Advanced mode, choose Add printer first, or tap an existing row to edit that printer's setup.
- Choose the roll or tape actually loaded.
The list offers media for your selected model. Matching the roll or tape is essential for the label to print at the right size.
- Set the connection.
For Wi-Fi, search for the printer or enter its address. For Bluetooth, pair the printer in Android's Bluetooth settings first, then select it in the app. For USB, connect an OTG cable and allow the permission prompt. Available connections depend on the printer.
- Print a test label.
Use Print test label at the bottom of Printer settings. The State line above it shows what the printer reports. If the test prints, you are ready to make labels.
Standard and Advanced printer setup are both free. Advanced provides 3 saved-printer slots on Free and 10 slots in total on Pro. See Free and Pro or printer compatibility.
The screens
Use By, Day Dot and Copy are on the bottom bar. Tap a tab or swipe left or right to move between them. The label at the top is a live preview: tap it to print. Printing a customised Day Dot requires Pro, as explained below. Check is your printing record, opened from under the preview on Use By and Day Dot.
Use By
For labels such as “opened on Monday, use within three days”.
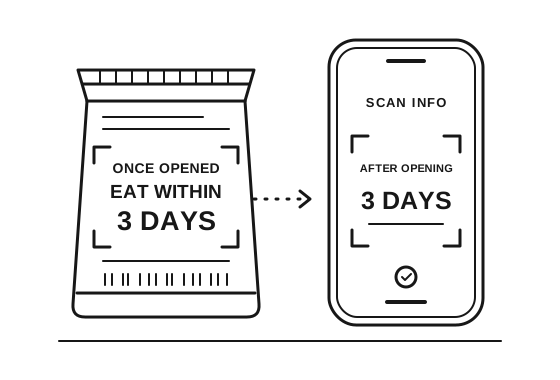
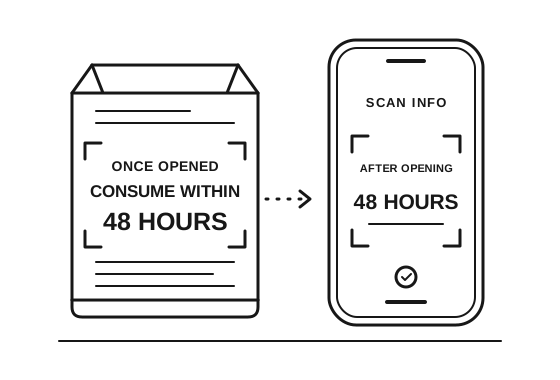
- Scan info reads a use-by date, best-before date or “eat within” instruction from the packet.
- Quick print scans and prints in one go.
- Dates sets the opened date, which you can backdate, and any packet date you want to honour.
- The duration grid and quantity box set how long it lasts. The label uses whichever comes first: the packet date or your chosen duration.
- + Add copy adds text from the packet or a line you type yourself. See Copy for short and long text.
Day Dot
For prep labels: what it is, what happened to it and when.
Free prints the default Day Dot: Made, with today's day and date. If you change any label information or add anything, the app asks you to upgrade to Pro when you try to print. This includes changing the action to Frozen, changing the date, adding a time, or adding a name, copied text or a use-by date.
- Action is the word at the start of the label, such as Made, Frozen, Cooked or Defrosted. It stays selected while the app is open and resets to Made when the app restarts. Printing a changed action requires Pro.
- + Add copy adds an optional name or description, typed in or read with the camera.
- The Time switch beside the action adds the time of printing at the far end of the label.
- Dates sets the action date and an optional use-by. The quantity box calculates a use-by in days, weeks or months from the action date.
- Recent lists previous prints. Tap a row for Print or Delete. Print makes a new label dated today, keeping the current screen settings. If those settings include changed or added Day Dot information, printing requires Pro. To print the same label with its original code and dates, use Check.
The band down the side identifies the weekday with a shape: a circle for Monday, a dome for Tuesday, a triangle for Wednesday, up to seven sides for Sunday. On the colour printer, the band also uses the day's colour. Tape warnings and printer routing are under Day Dot colours in Settings.
Copy
Keep cooking instructions with food you decant into a tub, or add a description to a food label.
- Photograph the packet and select the text.
Drag the corners of the box around the part you want. Only the words inside the box are read; the photograph is not saved.
- Check and tidy the text.
The recognised words appear in the text box below. Edit them there and check them against the packet. Long instructions are laid out as paragraphs.
- Print the copied instructions.
Print makes a separate label. On a small roll, a long block is split across as many labels as it needs.
+ Add copy on Use By and Day Dot uses the same camera. A short line, up to about 40 characters, goes on that food label. Longer text prints as a second sticker straight after the first, so the original label still prints.
Adding text to a Day Dot counts as customising it, whether the text is typed or scanned. The app asks for Pro when you try to print that Day Dot. See Free and Pro.
Long copied text needs a Brother QL and a roll the app recognises. Short text works on all supported printer types, including a name on a P-touch Day Dot label.
Check
Open Check printed labels beneath the preview on Use By or Day Dot. It groups printed labels into Expired, Near expiry and Still fine; it is not a tab on the bottom bar.
- Check a label scans one label and shows its status.
- Scan a shelf reads a row of labels and draws a box around each one it can read, using red for expired labels.
- Tap a row for Reprint or Delete. Reprint keeps the same tracking code and dates, adds no new record and uses the roll currently loaded.
The printer badge
The small printer at the top left of every screen has a status dot. Tap it for the full details: printer, roll, connection and the last response.
- Green · Ready
- The printer answered and is ready to print.
- Amber · Asking
- The app is checking the printer. Give it a second or two.
- Red · No answer
- Check power, range, cable and permissions.
- Grey · Not set up
- No printer has been configured yet.
Day colours and several printers
Open the cog at the top right, then scroll to Day Dot colours in Settings. Choose Map colours to days to set your own colours, or Use standard colours.
| Day | Tape colour |
|---|---|
| Monday | Blue |
| Tuesday | Yellow |
| Wednesday | Red |
| Thursday | White |
| Friday | Green |
| Saturday | Orange |
| Sunday | Black with white text |
Choosing a colour enables Tape colour warning. You can switch the warning off without losing the mapping. It does nothing until a colour is set.
One printer and a box of tapes
A P-touch can report the tape it holds. The app checks when Day Dot opens, and the preview takes on a light wash of the last reported colour. If that tape differs from the label day's colour, Wrong tape colour? offers:
- Print anyway — continue for this label only.
- Print, and stop asking today — continue and silence that printer's reminders for today.
- Print, and turn the warning off — continue and disable the warning.
- Not now — print nothing.
The app asks each time until you silence or disable the warning. After printing, the message names the tape used, unless you turned the warning off. QL printers cannot report their tape colour, so this warning does not apply to them.
Several printers
Advanced setup is available on Free, with space for 3 saved printers. Pro increases the Advanced list to 10 printer slots.
- Set up the printers in Advanced mode.
In Printer settings, select Advanced, then Add printer. Give each printer a name and configure its connection and roll. Each row shows its connection, roll width and print colours. Tap a row to edit or remove it; select the Default radio button for your default printer.
- Map printers to weekdays.
Under the Settings cog, enable Printer for each day and open Map printers to days. Each weekday shows its tape colour and chosen printer. Several days can share one printer.
- Match colours automatically if useful.
Match printers to colours asks each P-touch what tape it holds and fills empty mappings. It never overwrites your choices.
Day Dot uses the printer mapped to the label's date. A day without a mapping falls back to the default, as do Use By and Check. The badge shows the selected printer. Change the default in the Printers list. See Free and Pro for printer-slot limits and Day Dot printing features.
Home screen widgets
Choose from 11 widgets in your Android launcher's widget list, ordered by size:
- Single buttons for Scan, Quick print, Copy, Day Dot, Check and Fast labels.
- A two-button strip for Scan and Quick print, two three-button strips and a four-button block.
- The full duration grid, which prints a Use By label straight from the home screen.
If a widget looks wrong or stops responding after an app update, remove it from the home screen and add it again. Launchers can cache the old layout. Fast labels requires Pro.
Locale
Open the Settings cog and find Locale. The four settings start on Auto and follow your phone until you change them.
- Language: British English, American English, German, French or Italian. System default follows the phone. American English uses wording such as “color” and “EXP”; British English uses “colour” and “EXP/BB”.
- Date order: 27 Aug or Aug 27, on screen and on labels. The app reads both orders back, so changing this does not stop older stickers being checked.
- Time format: 24-hour or 12-hour time for Day Dot print times.
- Packet dates: how to interpret an ambiguous date such as 03/04/26. A number over 12 resolves the order regardless of this setting.
Printed dates, fixed words such as “use by”, “opened” and “lasts”, and the Day Dot action follow the app language. A storage line copied from a packet stays in English, which is the form the app stores and reads back. Every language in the picker supports reading the app's own printed labels.
Choose your label language before you start. Check and the shelf scan recognise the words printed on the label. Stickers printed before a change of app language are not recognised afterwards. This is different from changing the date order.
Rolls and tape
- Brother QL: DK continuous or die-cut rolls, including black and red rolls. Select the loaded roll in the app so it can print the red where supported.
- Brother P-touch: TZe tape from 6 mm to 24 mm, depending on the model. The PT-P300BT Cube uses Bluetooth and takes tape up to 12 mm.
- Brother VC-500W: the supported full-colour printer, and the only one that prints the weekday band in full colour.
The app uses the printers' own protocols rather than Brother's driver. It has been tested on a QL-810Wc, VC-500W and PT-P300BT. Other models in the app's list use the same documented protocols but have not been tested here.
Always tell the app which roll is loaded. For a problem with a listed model, start with Print test label and the State line in Printer settings. See the printer page for a quick compatibility overview.
If something goes wrong
Why does Day Dot ask me to upgrade when I print?
Free prints the default Day Dot: Made, with today's day and date. Any changed or added label information requires Pro to print, including a different action such as Frozen, a different date, a time, copied text or an extra use-by date. The upgrade prompt appears when you try to print.
To print a default Day Dot on Free, set the action to Made, use today's date and remove any added information, including time and copied text.
Is Advanced printer setup free, and how many printers can I save?
Both Standard and Advanced setup are free. The Advanced list has 3 saved-printer slots on Free and 10 slots in total on Pro. You do not need Pro just to use Advanced mode.
“Printer didn't answer” or the Wi-Fi printer is not found
Check that the printer is on and, for Wi-Fi, on the same network as the phone. Guest Wi-Fi can block discovery. Addresses can change: open Printer settings and search again.
For Bluetooth, check that the printer is paired in Android's Bluetooth settings and is within range. For USB, check the cable and permission prompt.
A P-touch says “transmission error”
Switch the printer off and on. After refusing a job, a P-touch can remain in that state and ignore later jobs. Restarting clears it; the app cannot clear this state itself.
Nothing comes out, or the light flashes
Check that the roll selected in Printer settings matches what is loaded. Change the setting or swap the roll. The connection block shows the printer's reported loaded media.
The label is the wrong size or half off the tape
Check the selected roll and tape width in Printer settings. A mismatch with the loaded media is the usual cause.
USB permission or switching back to Wi-Fi
Use an OTG cable and allow the permission popup. Accepting the app's offer to use the cable temporarily switches to USB, then returns to Wi-Fi when you unplug it.
Choosing USB yourself in Printer settings is permanent and does not switch back on unplugging. If the permission popup has disappeared, print a test label to bring it back.
Dates look wrong
Check your phone's clock and date first. For an ambiguous scanned packet date, check Locale → Packet dates. Date order controls how the date is displayed.
The camera did not recognise a date or text
Move closer, improve the light and keep the label reasonably level. Reflections, curved packaging and unusual fonts can make text harder to read. In Copy, adjust the box to include only the words you need, then check and edit the recognised text before printing.
A long Copy label will not print
Long copied text needs a Brother QL and a roll the app recognises. On other supported printers, use a short line, such as a name, with + Add copy. See the Copy guide.
A widget stopped working after an update
Remove the widget from the home screen and add it again from your launcher's widget list.
Do I need Brother's own app or driver?
No. UseBy & Print handles supported printer setup and printing using the printers' own protocols.
How do I remove app data?
Use Android's app-storage controls or uninstall the app. If Android backup is enabled, settings and labels may be restored when you reinstall. See Your data.
Free and Pro
Free
Everyday labels and up to 3 saved printers in Advanced mode.
- Standard and Advanced printer setup: both included, with 3 saved-printer slots in Advanced.
- Default Day Dot: print Made with today's day and date.
- Use By and standalone Copy label printing, with no daily print limit. Dates and text can be entered manually.
- Three packet reads a day with the camera, shared between packet dates and Copy instructions.
- Unlimited label checks, shelf scans and printer or roll scans during setup. These do not use your daily allowance.
Pro
One payment, with no subscription.
- 10 printer slots in Advanced: room for a larger saved-printer list.
- Customised Day Dots: print changed actions or dates, add a time, include copied text or names, and add other label information.
- No daily limit on reading packets with the camera.
- Fast labels: print today's Day Dot in one tap from a grid.
The three-per-day camera allowance counts packet reads only. Manual entry is available for Use By and standalone Copy labels. Printing a Day Dot with any changed or added information requires Pro, even if you typed it yourself; the app prompts you to upgrade when you try to print.
Open the Settings cog and select Get Pro at the top right, or follow an in-app upgrade prompt. Once purchased, that place reads Pro.
Pro belongs to your Google account. It returns automatically after a reinstall or on a new handset using the same account, without a manual restore or another payment.
Your data
- Printer settings, printed-label records and recent prints are stored on your phone.
- Text recognition runs on the device. Scanning does not upload or save photographs.
- The app connects to your printer and searches your local network only when you ask it to find printers.
- There is no UseBy & Print account, analytics or advertising.
- If Android backup is enabled for your Google account, settings and the label list are included.
The app uses camera permission for scanning, Bluetooth to reach Bluetooth printers and network access to reach Wi-Fi printers. Read the full privacy policy.
Open source licences
UseBy & Print includes open source components from the Android Open Source Project, Google and JetBrains under the Apache License 2.0. ML Kit and the Google Play billing component use Google's own terms.
Read the software notices and licences for the component list, other component terms and the full Apache licence.
Still need a hand?
Questions, bugs and requests are welcome. For printing problems, include your printer model, phone or tablet model, loaded roll or tape, connection type and what you were trying to print. The State line in Printer settings can help explain what happened.
Email support